American Action Fund for Blind Children and Adults
Future Reflections Winter 2021 MUSIC AND ART
Tactile Pictures Made Easy
by Ann Cunningham
 From the Editor: Ann Cunningham is a co-owner of Sensational Books, a company that creates tactually accessible books and the Sensational BlackBoard, a raised-line drawing board. Currently she is focused on publishing a collection of books that are designed to introduce young children to tactile graphics.
Over the past twenty years I have talked with a lot of people about the importance of pictures. Images are an ever-present form of communication in our world. Yet blind children seldom have access to even a few tactually illustrated books. While their sighted peers are bombarded with images that amuse and inform, getting images into the hands of blind schoolchildren remains a hit-or-miss proposition.
Because blind children grow adept at getting information from verbal descriptions, adults may conclude that they really don't need access to pictures. I strongly believe that a great deal of valuable incidental learning is missed when images aren't provided. Verbal descriptions are highly subjective, and they often overlook the subtle nuances that pictures provide.
Let's examine an instance where people use pictures to learn important information quickly and accurately. A road sign uses arrows because they are unlikely to be misunderstood. How many times has a person given you directions and said, "Turn right" when they meant "Turn left"? How often does a person hear, "Turn left" and mistakenly turn right? It happens all the time!
This kind of miscommunication can lead to some unfortunate outcomes. To minimize accidents, traffic signs depend on pictures to represent on and off ramps, merging traffic, and curves. A road sign with a bold black arrow indicating the road is going to turn to the right is unlikely to be misunderstood. But even more information is being shown in the sign. Is it a slight right turn, a sharp right turn, a Y in the road, or a U turn? This is all important information, and a simple picture can give it to you quickly.
Try to describe a sign that shows a series of mountain curves. Probably you explained that there are three curves in the road. Beyond the number of curves, did you describe the difference in distances between the three curves? Did you think to explain how a large, sweeping curve precedes two close, tight curves? How long did it take you to organize your thoughts and describe the image?
Regardless of how old a person is, it is never too late to start using pictures. And a person is never too young to start, either. So don't worry about age—this is going to be fun!
There are easily a million ways to make a tactile image, but I have come up with some techniques that can quickly get you on the road to drawing tactile pictures. Try out your own ideas as soon as they come to you!
You will need:
- One ball point pen—a stick or retractable medium point. I buy packages of ten at the Dollar Store. Most likely any pen you picked up at the bank or a hotel will work just fine. Be careful if you use your favorite pen; you will be pressing hard, and you might damage the point.
- Heavy paper, between 65 and 100 pounds. Card stock, cover stock, or Braille paper should work fine. I use 65-pound white card stock. An office supply store will have a variety of weights and colors. https://www.officedepot.com/a/products/458621/Neenah-Bright-White-Premium-Card-Stock/ Braille paper works well, too. (90 to 100 pounds)
- Craft foam. A local craft store will allow you to select one sheet of craft foam. Amazon only sells it in packs, and you only need one sheet. 9” x 12” sheet of craft foam: $0.99 https://www.michaels.com/creatology-foam-sheet-6mm/M10390268.html?dwvar_M10390268_size=9%22%20x%2012%22&dwvar_M10390268
Armed with these three supplies you can introduce pictures into your child's life. Let's start where kids' interests naturally are. Draw a baby's face.
 Draw a circle about two inches in diameter. When you are creating a drawing, make it large enough so that the features are not too close together. It can be confusing for a small child to know where one feature stops and the next begins if their fingers are touching them both at the same time. However, don't draw the picture so large that it is hard to find all the parts. Just try something, see what the problems are, and then fix them. Once children can talk you can discuss your images and get clear on what is working for them and what isn't. You will need to observe younger children to determine what they are able to understand. If your child is very young, it may take a while before they even begin to notice the pictures.
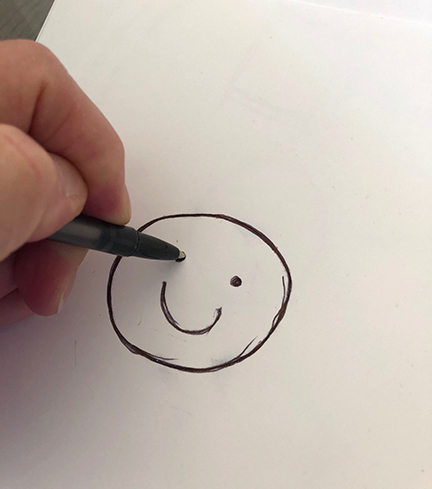
For this simple smiley face two inches will do. The circle does not need to be perfect. You can draw the shape freehand, but try to make it smooth. The technique I suggest is to place your paper on the foam and draw the circle by going over the line gently a number of times. This way the paper fibers are encouraged to take on a new shape without ripping apart. When you flip the paper over, you will have created a smooth raised line.
If your circle is smooth and easy to feel, move on to the eyes. But if the circle is lumpy or torn or not clear to read with your fingers, try again. This is an acquired skill. With a little bit of practice you can quickly learn how to handle the pen and make it do what you want it to do. In fact, I always keep a piece of paper handy so I can try out the next feature before I add it to the picture I want to keep—sort of like a practice swing with a golf club.
Draw two solid circles for the eyes. This makes nice, smooth dots. Draw a small circle for the nose and a nice curve for the baby's smiling mouth.
If your child is fussy, you can draw a fussy baby with an open mouth and tears running down their face! As you add more details, be sure to enlarge the picture size to fit them.
When you and your child look at the picture together, point to the picture and talk about what you are touching. Capture your child's attention by tapping where you want them to touch. When they find the picture, give them a big cheer, "You found it!"
One day it will click. Be sure to refer back to your face and your child's face when you attach words to the image with questions such as, "Where is the baby's mouth?" "Where is my mouth?" "Where is your mouth?"
You can view a short video about creating tactile drawings at https://youtu.be/-OZ6yEYEr08.
Search for read-aloud infant board books and children's books on YouTube.com for inspiration. Also check out books from the library and create some tactile images for your child to explore as you read the story. https://www.youtube.com/watch?v=qoSELY1CMuQ
Hello Baby Faces by Priddy Books is a very basic book that might inspire you. Search for Mo William's books about a pigeon that gets into comical situations. The illustrations use basic shapes very expressively.
Look for images that have simple forms. For instance, Baby Shark might already be in your library. Trace an outline of one shark. Only add important details such as the eye and teeth on that picture. A good second illustration could be the shark family, showing the difference in size among the baby, mommy, daddy, and grandparents.
If you have a plastic or rubber model of a shark, you can explore it and even put it in the tub at bath time. Talk about it being in water. Then add some waves to the top of the picture of the baby shark! Now it is in the water, too.
You might want to color in the pictures so that you create high-contrast images. Or better yet, give the colors to your child and let them color inside and out of the lines! This can be a very socially engaging activity that almost every kid enjoys.
 You can use crayons, colored pencils, or permanent markers. (Water-based markers might wrinkle the paper, so test on your scrap first!) You also can cut the basic shapes out of contrasting paper and glue the images together. Be sure to watch your child as they play with collage books, because there is a chance they will pull the book apart and put small pieces in their mouth. Once your child has passed the stage where everything goes into their mouth, you can determine when it is safe to add more embellishments to the pictures.
A lot of books have simple pictures for children. Use their style to inspire a book picturing objects in your home that your child is familiar with. In this way your child can start making the connection between real objects and symbols, the simple images used to represent those objects. This is a critical first step toward literacy.
If your child is older, add Braille and pictures to the books they already love to create a more engaging activity. Even if you only add one picture to a book, it can spark more interactive engagement among you, your child, the book, and the world your child lives in.
Feel free to contact me with your questions and ideas at [email protected]. You may visit my website at http://www.acunningham.com or http://www.sensationalbooks.com.