Ladder Desk—A Creation Story
by Joe Schissler
From the Editor: Joe is a member of the National Federation of the Blind of Maryland and actively participates in the activities of the Central Maryland Chapter. He is a former student at Blind Industries and Services of Maryland and a senior citizen who retired after a productive life of forty-one years from the Johns Hopkins University Applied Physics Laboratory in Howard County, Maryland. There he worked on the Navy’s Tomahawk Weapon System. He became blind after a bicycle accident, but it is clear that his motivation and creativity were not diminished by it.
In the National Federation of the Blind we are always encouraging blind people to expand their horizons and to take on tasks that go beyond the traditional roles usually assigned to us. Woodworking is one of the things we teach at our NFB training centers, but seldom do we get articles that discuss the way in which complicated projects are done, the specific challenges we have as blind people in doing them, and how the end product fares in competition with things built by people with sight.
In this article Joe provides enough detail to show every challenge he faced, how he met it, and the results of his work. We have tried to include many of the pictures Joe has provided, but the appendices are so detailed that we have decided to provide them only to those who write requesting the full article. If you wish to try building the desk or want more detail than we provide here, please write to me at <[email protected]>. Here is the article. Enjoy!
This is the story of the creation of a desk that I built for my daughter Erika. I am writing this to show others, both blind and sighted, that it is possible to safely build a fairly complex piece of wood furniture without seeing what you’re doing. I also want to leave a record of how I did it, in case anyone in my family cares a few years from now. (I probably will have forgotten by then.)
I have been doing amateur woodworking for most of my adult life, and when I totally lost my vision in February 2009, I thought that hobby was over. My basement workshop sat idle for about three years. Then I enrolled in a rehab program for seniors who have lost or are in the process of losing their vision. This program is run at Blind Industries and Services of Maryland (BISM), where they have, among many other things, a full-blown woodworking workshop equipped with all the professional power tools and equipment anyone would want, most of which I do not have at home but learned to use. I quickly realized that I can continue my woodworking hobby.
My first project at BISM was a small decorative table, which I built there and in my shop at home. It was also the first project I ever built using only hardwoods. It won a first-place ribbon at the Howard County Fair in 2014. This confirmed my belief about continuing my woodworking. Erika and my wife Eleanor helped me clean up and reorganize my workshop, and I have been in there almost every day since.
After the fair in 2014 I asked myself what I was going to build next. Then Erika asked me to build a ladder desk for her. My response was, “Okay, but what’s a ladder desk?” Erika had seen a ladder desk somewhere before and was able to describe it in general terms, and apparently the internet has lots of photos of them. Of course I couldn’t see them, but she and Eleanor talked me through the general characteristics. I now describe a ladder desk, which resembles a step ladder with the steps being replaced by shelves and the main shelf being the working surface of the desk. The back legs are vertical rather than slanted as in a stepladder, so the frame of the desk consists of two triangles, one on each side, and the shelves are supported by the frame. In our initial discussions Erika asked that it be made of cherry and maple and finished with tung oil and paste wax.
With this understanding I asked her to do the basic design of what she wanted, and I suggested that she sketch it out to get a feel for the proportions that she thought were correct. She responded by drawing the desk and defining the height, width, the number of shelves, and where they would be placed. She also explained the sizes of wood to be used. She emailed me a preliminary set of measurements, which we discussed and refined. The result of all this was a final design that is very similar to her first definition but had many minor modifications. I do not mean to imply that this was a quick process. The whole thing took place over several months, and the design was not really settled until the project was complete, as has been the case for all my woodworking projects.
As the building progressed I found I had to figure out how I was going to accomplish each step in construction and finishing. And, since I am totally blind, I frequently had to find new ways to do things. This is not a complaint, because this is the part of woodworking that I enjoy the most, although I have to admit that the challenges are a little greater now that I have to do things without seeing what I’m doing.
Foremost amongst the issues I was faced with, the fifteen-degree angle that permeates the design was the most interesting. This reminded me of mathematics that I hadn’t thought about much since high school. I found myself using algebra, geometry, and trigonometry to work out some of the design issues and cuts that had to be made. Many decisions as to the construction details were made during December. Among other things I had some concerns about constructing the fifteen-degree angle. In addition I had made the decision to use edge-to-edge joints at the top where the vertical and diagonal frame members meet and overlapping joints where the frame members meet at the bottom. An overlapping joint involves removing one-half of the thickness of each board to be joined so that the two boards fit together perfectly. In referring to several woodworking books that I have in my library, there seemed to be no real consistency as to the names for these overlapping joints. I’ve seen both “cross lap” and “end lap” used, depending on where the joints fall on the boards. So I will just call them lap joints. At the bottom, the two lap joints between the vertical and horizontal frame members are ninety-degree angles, but the two lap joints between the diagonal and horizontal members are seventy-five degrees.
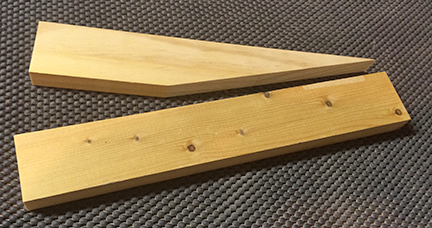
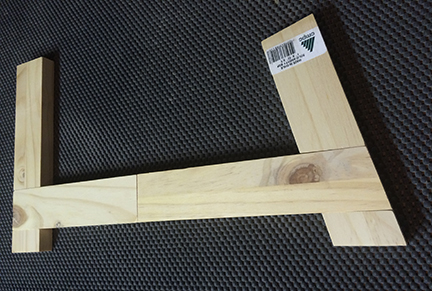
So I made test cuts using some old three-quarter-inch pine boards that I had in my shop. My wife helped with the first cut, which cut a wedge-shaped piece at the top of the board that simulated the vertical frame member. We used a woodworking protractor that I had, and she sighted along it to get as close to fifteen degrees as she could, and I made the cut. I verified the angle using the trigonometry described in Appendix A at the end of this paper. I also realized that I could have used trig to make the first cut without any help. I remembered some geometry that said that that wedge could be used to set any later fifteen- or seventy-five-degree cuts. These test cuts turned out perfectly and are shown in the photos below. For better understanding, the first two photos show the cuts unassembled, and the third photo shows the bottom joints assembled. They are shown as viewed from the left side as seen facing the desk so that the front of the desk is on the right and the wall is on the left.
 As I started construction the desk design looked like this: the frame consists of three boards on each side. Each board is one inch thick by three inches wide. On each side the vertical board is sixty-four inches long, the horizontal board is about twenty inches long, and the diagonal board is about sixty-seven inches long. The horizontal board is joined to the other two using lap joints, and the vertical and diagonal boards are joined edge-to-edge at the top and may use a screw from the back. The angle used for all the angular joints is about fifteen degrees.
 All shelves are twenty-four inches long by three-quarter inches thick and are joined to the frame using three-eighths or one-half-inch deep dadoes. The top two shelves should extend to the outside edge of the diagonal frame member and be beveled to the correct angle to be flush. All shelves will have a two-inch high backstop. The top shelf is about four-and-a-half inches deep, and the bottom of the top shelf is six inches from the top of the frame. The second shelf is about seven-and-a-half inches deep, and the bottom of the second shelf is seventeen inches from the top of the frame. The desktop (shelf) is about twenty inches deep, and the bottom of the desk is thirty-five inches from the top of the frame.
 The desk dimensions are twenty-four inches wide by twenty inches deep, but there will be a three-inch border of a wood different from the center. So the inner square dimensions are eighteen-by-fourteen. At this point the details of the desktop remained to be determined.
The horizontal frame member will be joined to the other members a couple of inches above the floor. This will make the bottom of the vertical and diagonal members the legs of the desk. A brace will join the bottoms of the two vertical frame members at the back for stability. It will be three inches by three-quarter inches by twenty-four inches and will be joined using three-eighth-inch mortice and tenons. In addition, I also saw the need for a cross brace at the bottom rear of the desk; this will provide more lateral stability. The details of this were to be determined later.
The above is a good description of the desk at this point in the process. The major change was in the thickness of the boards that composed the frame. I recommended increasing them to one inch from the three-quarter-inch. Cross bracing was added for better stability, and some of the joinery details changed.
Next came the calculation of the lumber needed and the actual purchase at Exotic Lumber in Annapolis, Maryland. Both Erika and Eleanor joined me in making that purchase. The following is a list of the material we wanted to buy. What we did buy changed based on the reality of what they had available at the time. For clarity it is noted here that the thickness of the rough boards purchased are expressed in increments of fourth of an inch; this is described in detail in Appendix B.
For the frame we needed to buy three six-and-a-half-foot rough cherry boards. Two are about seven or eight inches wide, and one is about four or five inches wide, either five-quarter or six-quarter inches thick. For the shelves and such, and assuming eight-inch widths, we needed four cherry short boards, which are six or seven feet long and four inches thick. We also needed to look at what they had available to do the design for the desk shelf, either soft maple or exotics in one quarter thickness or something else. For those readers who are not familiar with but are interested in the details of how to buy wood for woodworking projects, I have incorporated some of these details in Appendix B at the end of this paper.
Although we had been there before to see what they had and how it worked, we finally made the buying trip to Exotic Lumber on January 2, 2015. Using Erika’s initial specification and the modifications we agreed to, the final list of the boards we needed for construction follows.
The frame required five six-and-a-half-foot pieces of cherry, each three inches wide and one inch thick. Four pieces would be used for the vertical and diagonal members of the frame, and one would be used for the two horizontal members. The rough boards should be five-quarter cherry six feet long. These will be planed to one inch and ripped into five three-inch wide boards. The shelves, including the desktop, the backstops, and brace at the bottom are all three-quarter-inch cherry. These can come from several of the four-quarter rough cherry “shorts,” which are six feet long. We needed a total width of at least forty-two inches of thirty-six-inch long boards, all three-quarter inches thick. This would determine the number of cherry shorts we should buy.
At the lumber yard we found that the five-quarter cherry boards were not to my liking, so I asked to look at the six-quarter boards. These were very nice, so I paid a little extra for the better boards. My original plan was to buy these rough boards and take them to BISM to plane and rip them myself. Then I accidently found that Exotic Lumber would do all the planing and ripping for me at a cost of $25 for all the boards—both the six-quarters and the four-quarters. It would have cost me that much just to get the boards to BISM, and then there is all the time and effort to do the work, while the lumber yard could do it while we waited. So we came home with six six-foot boards planed to three-quarter-inch and various widths, mostly five and six inches wide. And six pieces of three-inch-by-one-inch by six foot boards, all cherry.
The only fly in this ointment was that Exotic Lumber’s planer had a couple of slight chips in the blade. I didn’t notice it at the time, but when we got the boards home, I found a couple of slight ridges running the length of each board. They all had to be sanded smooth. This wasn’t hard to do, but it took a fair amount of time.
 Erika also requested a decorative inlay of maple on the desk surface itself. We purchased a half-inch thick piece of hard maple that was about four feet long and four inches wide for this purpose. It turned out in the end that I couldn’t figure out how to use it in a pleasing way for this project, so it has been used to good effect in a jewelry box I recently made for my granddaughter Kailey. So my wife and I later returned to Exotic Lumber for a rough board of soft maple, which they planed to three-quarter inch. Its use will be described later.
The first step in construction, after sanding both the three-quarter- and one-inch boards, was to cut and build the two frames. Before proceeding with this description let me give a brief overview of the tools I have in my basement workshop, which is shown in the photo below.
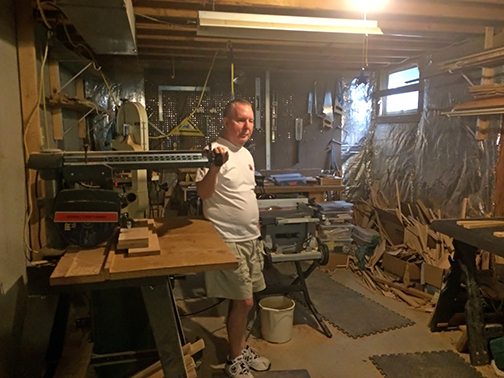 The shop includes a ten-inch, two-horsepower Craftsman radial arm saw that is at least thirty-five years old; a small, portable ten-inch table saw that is fairly new; a six-inch band saw several years old; a three-eighth-inch power hand drill that I bought in 1970; several kinds of sanders; and numerous hand tools including many chisels, rulers, and clamps of various sizes. I also have a very nice, sturdy and fairly large workbench with a good wood vise. The only saw I used for this desk was the radial arm saw. For a discussion of the three power saws I own and their attributes and pros and cons, see Appendix C at the end of this paper.
One of the key tools for my projects since I lost my sight is a Click-Rule. It allows me to make measurements accurate to one-sixteenth of an inch and one-thirty-second if I try hard. I used it for almost all the measurements for this project. I purchased one from the Independence Market at the National Federation of the Blind in Baltimore. It is the only tool that I use that is designed specifically for use by blind woodworkers; all my other tools are of standard design for general use.
The Click-Rule has tactile markings to enable blind users to tell where a moveable shaft is set. Moving the shaft in or out makes a clicking sound—hence the name. One click represents a movement of one-sixteenth inch. My Click-Rule is shown in the photo below—with the movable shaft extended two inches of a maximum extension of six inches. The Click-Rule as shown can measure from one-sixteenth of an inch up to one foot, but it comes with three twelve-inch extension rods to expand its capability to four feet. The leading edges of the two flanges are exactly six inches apart, so the ruler as shown is set to measure either two inches or eight inches, depending on which flange is used for the measurement. And the flanges are each exactly one-quarter-inch thick, which can be used to accurately position cuts. (See the discussion on cutting dadoes later in this paper.) I found this to be tricky, and I made a few errors at first. I still have to think carefully to get it right.
 For approximate measurements I sometimes used a wooden folding rule. I know how long it is for any number of open segments, and I could get within a few inches with that. I also cut several strips of wood to lengths that I frequently had to measure, in particular the twenty-five inches for the distance between the two frames.
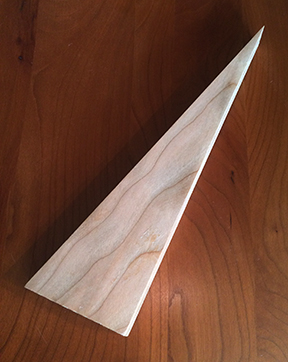 The very first cut for the desk was at the top of the first vertical frame member, using the aforementioned pine wedge to set the angle, and the resultant cherry wedge is shown in the photo below. This was used for the second vertical member and for all subsequent angular cuts. This was done for consistency. Using this wedge often required thought, creativity, and experimentation to get the required angular cut. I had to use the radial arm saw’s fence, which runs perpendicular to the saw blade, and/or a right angle square to create a fence parallel to the blade. Then I used the wedge to get the desired angle.
Another problem that had to be solved was how to make a cut on the end of a six-foot-long board using a radial arm saw with a three-foot wide table. The end not being cut had to be supported, and I don’t have any sky hooks in my shop. Nor do I have any of the adjustable supports made for this purpose. These have a height-adjustable roller so the board can be supported and moved, but they aren’t cheap. So I made a substitute using a stepladder, a support that fits over one of the steps, and some of my wife’s sewing magazines to adjust the final height to the height of the radial arm saw’s table. One end of the board sits on the saw’s table, and the other sits on the jury-rigged stepladder—problem solved. It’s crude, but it works. I used this device many times in building this desk. Again, this is a part of woodworking that I really enjoy.
As described above, the first two cuts for the desk were to create the angled surfaces at the top of the two vertical frame members. Later, these angled surfaces would be glued (and screwed) to the top edges of the diagonal members. Then one of the uncut six-foot one-inch cherry boards was cut in half to become the two horizontal frame members. At this point, all these boards were cut longer than required to allow for mistakes and “final tuning.”
Next came the four lap joints that would join the two horizontal frame members to the vertical and diagonal members. This required removing one-half-inch thickness from each board involved in each joint. There are four joints, so there were eight areas where wood had to be removed to a depth of one-half inch, and each area was about three inches wide.
In woodworking terms, a dado cuts across the grain of a board, so all these lap joints require making dadoes, while a groove is a cut that runs along the board. There are circular saw blades for just this purpose called dado blades. They consist of multiple blades that can be stacked together to make a wider cut on each pass. In Appendix D I have included many details about dado blades and making dadoes, including ensuring their accurate placement on the board.
There is an old and very true saying in woodworking: measure twice and cut once. For all my recent work I always expand this saying to include the setup for the cut and I increase the “twice” to three or four times. For all woodworkers, and particularly for the blind woodworker who can’t see what he or she is doing, the setup must include the placement and any needed movement of hands. I am right-handed, and I usually used my left hand to hold the wood and my right to pull the saw blade, and I always made very sure that my left hand was not where the blade was going to go. Making one wrong cut can lead to one or both of two results: one can remove fingers, and the other will lead to lots of extra work to either fix the piece or do it again.
Next came the gluing and screwing required to assemble the two frames. For each frame the first joint that had to be done was the one at the top—the edge-to-edge gluing of the top of the vertical and diagonal pieces. Because of the fifteen-degree angle at the top of the vertical piece, the problem here is that there were no parallel sides to make a good clamp that would not slip as tension was applied. This was exacerbated by the fact that liquid glue is actually a lubricant until it sets up, and the joint has to be held motionless until that happens. I used Elmer’s Carpenter’s Wood Glue throughout this project. In many of the joints I also used either wax paper or plastic wrap to protect surfaces I did not want to get glue on.
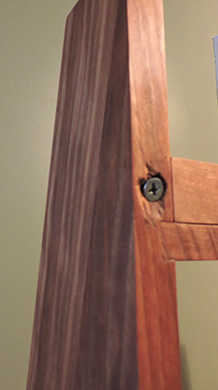 To glue this joint I decided to use a single screw to hold the two pieces together until the glue was completely dry. I used a large wood screw about four inches long, and I drilled holes from the back through the vertical member into the diagonal front member, such that, once the glue was applied, the screw would pull the joint together as it was tightened. Once the screw was in place, I was able to apply pressure over the length of the joint. This same procedure was used on both frames, and in the end I decided to leave the screws in place. These screws are the only metal objects in the desk. In trying to countersink the screws, I inadvertently chiseled a gouge around the head of one screw. I was told that the county fair judges took points off for this.
Once these joints were done—and I was mildly surprised that the joints were solid and the angles of the two frames were virtually identical—the horizontal member had to be attached near the bottom of the vertical and diagonal pieces. I left one inch of these pieces extended to become the legs of the desk. Also, the lap joints at the back had to allow for the brace board to fit into that joint along with the horizontal frame member. It was in making these lap joints that I made a somewhat serious mistake. I failed to get one of the angular dadoes in the correct place. I missed by about a quarter inch. This led to making the dado wider on one side and filling in the gap with a slice of cherry on the other. I did it the best I could, and after the sanding, it didn’t look (feel) too bad. If you are not looking for it, you might not notice it. However, the judges at the county fair did see it, and this, together with the aforementioned gouge around one of the screws, may have cost me a first-place ribbon.
At the same time I was working on the frame, I was also cutting several pieces of three-quarter-inch cherry, each about thirty inches long. These were for the two top shelves, the three backstops, and the braces at the bottom in the rear. The boards for each shelf were edge-glued to appropriate widths, sanded smooth, and set aside for later use. The only noteworthy issue with the shelves was the actual gluing. This required applying the glue to both edges of each board and clamping them together so as to minimize the sanding required. I have done this many times before, but I had never had to glue boards this long when I couldn’t see what I was doing. It had to be done by feel and fairly quickly. This initially led to much glue on my fingers, but I figured it out without too much mess.
Once the frames were complete and sanded, dadoes had to be made in the inside edges of the vertical and diagonal members to slide the shelves into. These dadoes were three-quarter-inch wide and about three-eighths-inch deep. While different from the original specification, my plan at this point was to make the width of the desk twenty-seven inches as measured from the outsides of the frame. This made the width as measured between the frames twenty-five inches. (This choice would turn out to be fortunate, as will be seen later.) Of course, the dadoes had to be at the correct height, as specified in the desk descriptions above, and the dadoes had to be aligned so that the shelves would be level when the desk is upright. The last point was easy since the dadoes could be cut in both the front and back members at the same time, with the vertical frame member against the fence on the radial arm saw. This is another situation in which I could have used sky hooks, but I had to use my jury-rigged stepladder to support the end of the frame. The only problem here was that the dadoes had to be on the correct side of the frame, and this required putting the stepladder on different sides of the saw for each frame—not hard to do, but it took a while to get it set up right.
What has not been discussed yet is the third shelf—the working surface of the desk. This is the twenty-inch deep shelf that Erika wanted to be a decorative desktop, one that has a pattern of maple incorporated into the cherry. We tried many variations using the hard maple that we bought on our first trip to Exotic Lumber. These included cutting the maple into rectangles that could be pleasingly inlayed in a solid cherry surface. To make a long story shorter, none of us could come up with a design that made anyone happy, and I had reservations about doing inlays since I don’t have a router that I would trust to remove one-half-inch of the cherry so that the maple pieces would fit tightly. I also did some research on the hardness of hard maple versus cherry. I was concerned about having to sand the finished surface and the problem that might result using two woods with very different hardnesses. (See Appendix B for a discussion of the Janka hardness scale.)
So we did a reset and looked for other ideas. Erika was busy at the time with her job and said “surprise me.” I had decided that soft maple would be a much better hardness match with the cherry, and my wife and I made another trip to the lumberyard. We bought a piece of rough four-quarter soft maple that they planed to three-quarters inch.
Then Eleanor came up with the idea that is reflected in the final product. We talked through it and, when we visited her sister Rosalie in Jupiter, Florida, in late February and early March, I sat down with Rosalie to make a scale drawing of the pattern so we could see what it would look like. With my help Rosalie was able to do it using PowerPoint software, and we all liked it.
Then, the next challenge was to build it, and I wasn’t sure if I could do it. It required a lot of cutting thin strips of both maple and cherry and lots of gluing and trimming and sanding. And I had to keep the maple separate from the cherry.
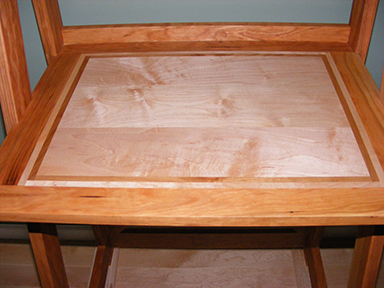
I first calculated the appropriate sizes of each piece and started from the center and worked out. The rectangle of maple was easy. Then I built the cherry surrounding it: four strips of cherry glued on one at a time. I glued the first strip, cut and sanded it to length, then repeated it three more times until the cherry ring was complete. Repeat for the maple ring. Then the result had to be surrounded by wider pieces of cherry, and the width of each piece had to be carefully calculated to ensure that the final desktop was exactly twenty inches deep by the twenty-five-and-three-quarter inches wide required to fit in the frame’s dadoes. The final step was to sand the whole thing and make sure it was both smooth and flat. The result is shown in the photo.
 Next came the assembly of the desk. This took a long time and was rather frustrating, but it was fun because it took a lot of imagination and figuring things out. I started this process without any glue, a technique called dry-fitting. I was dealing with the two very large frames, three shelves, and a lot of smaller pieces. During these many dry runs, I felt like I needed several extra hands. But, after much trial and error and the use of several measuring sticks and clamps, I was able to figure it out.
All these pieces had to fit together and in a very specific order. If the order wasn’t right, I could get to a point where I could not fit in a piece, and that would be a huge problem once I got to the point of actually using glue. I can’t count the number of times I put it together and took it apart. These dry runs were rehearsals to get the order of assembly correct and to do a lot of fine-tuning of the individual pieces. I did all this with the desk lying down—sometimes on its back and sometimes on its front. On its back, it was easier to fit the shelves, and on its front, it was easier to work on the braces that fit on the back.
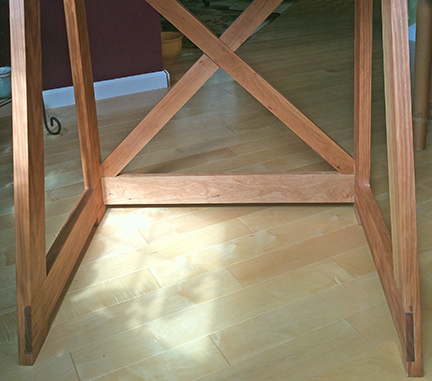
The only part that hasn’t yet been discussed is the cross brace that provides lateral stability. This was done by using two pieces of three-quarter-inch cherry that fit in an x-shape between the frame members on the sides and the bottom of the third shelf (the desktop) and the top of the horizontal brace that fit in the dadoes that also held the horizontal frame members. It turned out that that rectangle was actually a perfect square—twenty-five inches by twenty-five inches. This made the construction of the lap joint easy; the two pieces crossed in the middle of each, and the angle was exactly ninety degrees. These pieces were added last, and I was concerned about how tightly they would fit, which was important for the stability of the desk. But they went in very tightly, to the point that I did not use any glue in the lap joint itself. The result as installed is shown below.
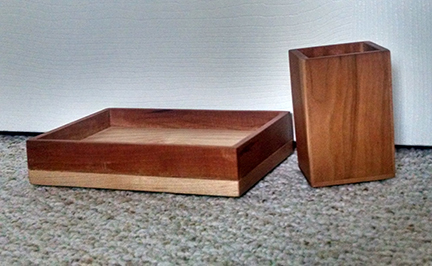
 As an afterthought, I used some of the leftover maple and cherry to make two desk accessories: a small, tall box to store narrow and long objects, such as pencils and pens, and a small, shallow box for other desk-related accessories, such as paper clips, erasers, etc. These small boxes required the use of thin pieces of wood, and this allowed me to explore the world of resawing. Resawing is a technique of cutting a thick board into thinner boards; in this case cutting a three-quarter-inch thick board into two one-quarter-inch thick boards. This is usually done using a band saw, and I have one in my shop. I had used one at BISM for this purpose with less than satisfactory results, but I had no trouble using mine at home. I used the resulting pieces to construct the two boxes shown in the photo below.
 Now the desk construction and assembly was complete, and the last step was to apply several coats of tung oil and two coats of paste wax. Erika had specified both, and I had done some of each on my previous project, the small table. But this was a much larger task. At BISM I had used the easily available product called Tung Oil Finish before, but I wanted to do some research to find out if that was the best thing to use.
It turns out that this product is not really tung oil. It may contain a small amount of tung oil or it may not, but the rest is chemicals that are added to speed up the drying time. On the other hand, pure tung oil is a natural product that comes from the seeds of the tung tree, which is found only in China and in some areas of South America. It is a nontoxic vegetable oil and can be used on surfaces that are used for food preparation. It cures rather than dries over time to bring out lots of rich color and grain patterns that my wife says makes the wood “pop!” It does take a long time for each coat to cure before applying the next coat. It is rather expensive and cannot be found in any hardware store, but my favorite woodworking supplier, Lee Valley, carries pure tung oil, so I bought some.
 Before starting to apply the oil, I spent some time raising the grain. If this is not done, some bad things can happen, as was the case for the first top I built and finished for the small table. I had perfectly sanded the glued-up top and followed that with tung oil and wax, just as I was instructed to do at BISM. A couple of days later, I noticed with much dismay that I could feel the seams of the top’s surface. For several months nobody could explain what had happened. I ended up making a completely new top.
When I read the directions for the pure tung oil, they reminded me that the oil will raise the grain if it is not already done. I knew this but had forgotten it. It turns out that a wood surface will become slightly rough if it gets wet. The water causes the grain of the wood to stand up, and it has to be sanded again to get it smooth. Later applications of water will not affect it nearly as much, and one time is usually enough. The technique is simply to use a fairly wet sponge (you really can’t get it too wet) to wipe all the wood surfaces, let them dry, and sand. When I used the wet sponge on the desk, I was surprised to find that the tiny ridges from the chip in the lumber store’s planing saw reappeared—not as much as before, but it was pretty noticeable, especially on the desk frame. So I had to resand all those surfaces. Then I raised the grain again, and sanded again, just to be sure.
 Once all that was done, I used a small pump-style plastic bottle to help in the application of the tung oil. This was the first large piece of furniture that I had the pleasure of putting pure tung oil on. The oil actually smells rather nice; even my wife agreed. And there are no warnings about ventilation, as exist with many other finishing products. I simply pumped a small amount onto my fingertips and rubbed it on, spreading it out as far as I could, which wasn’t far for each pump. I then spent a few seconds rubbing it in. The pump bottle made this task much easier than it would have been without it, and I soon got the hang of it. It took about ninety minutes for each coat. I did a reasonable area (about one-fourth of the project), then went back to wipe off the excess, and continued until that coat was done. Then I came back about an hour later and wiped again to get up any resurfaced excess. Note that tung oil is an oil, and rags that get damp from wiping off any excess oil should be properly handled. They are susceptible to spontaneous combustion and should be spread out to dry and disposed of properly.
I found no consistent directions as to how long to wait between applications and how many coats to apply. I waited at least three days for each coat to cure and put three coats on the frame and four on the shelves. The Lee Valley directions recommended up to ten coats on surfaces such as the top of a desk, but it gave no explanation of what the value of this many coats is. No one said anything about putting furniture paste wax over tung oil, but I did it.
The final result is shown in the two photos below. Erika saw her desk for the first time at the Howard County Fair, and I believe she was surprised.
Now this project and story are finished, but the life of the desk has just begun, and the benefits in my life and in the expanded vision of what I can do will extend far beyond the pages of this article.
Media Share
