American Action Fund for Blind Children and Adults
Future Reflections Fall 2022 STEM
The Accessible Origami Project
by Lindy van der Merwe
From the Editor: Lindy van der Merwe is a blind mother raising two teens in Cape Town, South Africa. She is a crafts enthusiast, and she has built a website that offers blind-friendly, verbal instructions for creating origami models. She reached out to Future Reflections when she discovered through a web search that origami is being used to teach engineering principles in the NFB EQ programs. Her Accessible Origami Project is an exciting resource.
 I have always been interested in arts and crafts, but my thirst for new craft projects took on a life of its own once I became a mum. I realized that arts and crafts could be lots of fun to share with my children, and they could also be a way for me to foster my own creativity.
I wasn't alone, it turns out. In 2007 a small crafts listserv was established called Crafting without Sight. Although some of us liked the more traditional crafts such as knitting and crocheting, many of us were interested in crafts such as scrapbooking, card making, quilting and sewing, cooking, decorating, and all kinds of crafts that we could do with our kids. Someone on the list mentioned origami. Since it was around Valentine's Day, a list member found some instructions on how to fold a paper heart. I tried the project, but I was not very successful.
A few months later I thought of looking into origami again. I remembered folding a paper plane or two and a fortuneteller as a kid. I thought all I'd need were my hands, some paper, and a hard, flat surface—and some instructions, of course.
Blind people have come a long way with the development of technology that gives us access to computers and the Internet. I started searching for the keyword origami, and I found lots of information, from craft sites with origami for kids to sites with hundreds of videos of people merrily folding away and sharing their handiwork with the world. However, to my dismay, it became clear that the instructions for everything from the simplest sailboat to the most amazing models are, for the most part, presented as diagrams.
A fairly standardized system of visual representation (the Yoshizawa-Randlett-Harbin system) is used worldwide in almost all modern books on the art of paper folding. As the ability to represent photos and drawings online progressed, artists and authors from all over the world have made diagrams available for folding origami models on various websites across the Internet. Sometimes instructions consist of only drawings, while some people prefer to combine visual elements such as pictures and drawings with verbal instructions. Files are often in gif or jpg formats, which are inaccessible for people using screen readers. PDF files are somewhat more accessible, but a lot depends on how the files have been compiled.
Even if one finds instructions that include verbal descriptions, often they refer to the pictures that accompany them. For instance, "fold the point up to the dotted line" tells me nothing, but "bring the top point down to meet the bottom point" makes sense without a drawing.
Probably the best way to learn origami as a blind person is to have someone show you how to fold a model. You will usually be able to memorize the steps and, with practice, fold a model successfully. Using this method, a blind person can learn through touch, feeling the other person's hands, the changes in the orientation of the paper, and the way each fold is made in order to visualize and memorize the folding process.
Unfortunately, origami is not yet popular here in South Africa. There is no national society or local club that I could join to gain hands-on experience.
 As digital technology and social networking developed, more information about crafts in general and origami in particular became available online through videos. Unfortunately, like photos and drawings, videos are of little help. Although many videos are accompanied by verbal instructions or transcripts of text, the instructions are very confusing without such verbal information as the orientation of the model and the direction of each fold. Also, for models that require more than four or five folds, it is often necessary to refer back to instructions. It is easy to forget folding sequences, especially if you don't fold a model on a regular basis. Also, a blind person cannot view the end-product before starting a project. Thus it is difficult to know how complex a model might be, and, once you have completed it, there is no way to compare your model to the actual one shown on a video or diagram.
I was extremely fortunate to find essortment.com, a site that had some text instructions already. I spent hours on this site, learning to fold simple models with the help of extensive description of folding sequences and methods. This activity filled me with immense pleasure and satisfaction. However, I found myself struggling a lot as I moved on to more complex models. Though folding could be done using text only step-by-step instructions, I realized that clear explanation of the results was also necessary.
I was becoming hooked, as most sites promised I would. The only way I could learn to fold many of the models was with the help of a sighted family member or friend. Though this is one way to learn, I wanted to pursue origami in my own time, and I did not want to be dependent on others in this regard. After all, arts and crafts are all about being creative and challenging yourself by acquiring new skills.
If you are the type of person who likes following recipes, origami may be for you. Many people find the sequential and sometimes repetitive nature of folding a model is very satisfying. Folding can be a meditative and relaxing endeavor as well. Some models have what I call a magic moment—that moment when a certain action is performed and the paper is inexplicably transformed from one flat form into something three-dimensional and recognizable. We must remember that origami is a varied art form, meaning there are very simple folds that are great to teach to children and that they will love to play with. Think of the simple sailboat or jumping frog. Then there are models that are so intricate that they can take many hours to fold. Between these are brilliant models that are useful in everyday life, including boxes, vases, bookmarks, cards, coasters, photo frames, envelopes, and more. Some models may be simple, forming the bare outline of an object and leaving the interpretation to the imagination. Other models are detailed replicas of actual objects. This means there may be thousands of ways to fold one specific object. You might find yourself drawn to the more artistic side of origami, or, like me, you might love to fold and design useful objects for decoration or getting organized.
Many origami pieces are not static. Some models can move, transform, jump, fly, tumble, make noise, and more. Needless to say, these action models are very popular with children, and many adults love them, too. I strongly believe that origami can be used with great success as a craft activity for blind adults and children, as well as in educational settings across different fields. Touch is an integral part of the creation process, and each object can be appreciated through touch as well. It is fairly easy to integrate origami into many learning areas, including math, science, art, and even language and comprehension. Paper is relatively inexpensive, recyclable, and portable, and folding can be done anywhere with limited time and limited space. Although many people might want to progress to advanced origami after some time, this does not have to be your ultimate aim. If you enjoy the process of folding, there are many simple models to choose from, and you will never run out of things to fold.
The Accessible Origami Project was established in 2009 with a basic blog where I have posted text instructions over the years. The blog is a work in progress, with instructions for models added over time. I have also compiled different text files called Volumes, which are downloadable from my blog or can be requested via email to [email protected].
I am encouraged by the fact that blind people seem to have discovered origami over the past few years. Lisamaria Martinez established the Accessible Origami Facebook page some years ago, and today it has about eighty members. LM, as she is known, is a blind blogger from the Bay Area, and her blog can be found at bayareablmom.com. She is passionate about origami and has been writing instructions herself and teaching in person and virtually over the past two years. Other sites have also been established with text-only instructions geared toward blind folders, including a French site with "folding sheets" for many models.
Recent changes to my blog include the creation of the following pages:
Start Here: an explanation of the features of the blog, including using the search function and labels to find models
- Introduction to Folds and Bases Used in Origami
- Links to other sites, where you will find links to other origami sites and related subjects
- Models on this site, an entire list of links to instructions for models in numeric order
- Models on other sites' containing links to models available from other authors using text-only instructions
- Accessible Origami Volumes as text downloads
To conclude, I am sharing the instructions for folding a traditional origami rectangular box/tray. I hope you will try this model, even if you have never done origami before. It has no complicated folds, and you may use any rectangular paper you have at hand. Copy paper, flyers, magazine pages, or construction paper will work fine. Don't worry if your first attempt is not perfect. Your folding abilities will improve with practice.
You are more than welcome to contact me for help, to make any suggestions, to share ideas, or to ask questions. If you want to contribute instructions or if you are a caregiver or teacher who can help teach origami, please let me know. My sincere gratitude goes to everyone who has helped me fulfil my dream of creating this project. It is my hope that it will benefit many blind and low-vision adults and children all over the world. For me, this is an ongoing project, since there is, as yet, very little access to this art for blind crafters. There are more models than one could ever imagine, and talented people all over the world are adding more on a daily basis. The Accessible Origami Project website is located at https://accessibleartsandcrafts.blogspot.com.
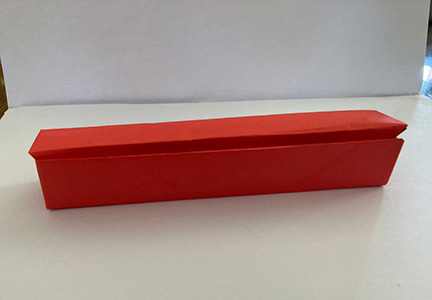
TRADITIONAL BOX/TRAY
Text-Only Instructions
Paper to be used: Rectangular, thicker paper is recommended.
Folding level: Easy/Beginner
Steps: 8
Description: This is a fairly large, shallow, rectangular open box or tray.
To make a lid, instead of folding the edges in to meet exactly on the center vertical and horizontal crease lines, leave a slight gap when you fold your edges inwards in Steps 3 and 5. This will result in a lid, identical to, but just slightly larger than your box.
Making a lid that fits perfectly may take some practice and a little guesswork, so experiment with scrap paper first.
If you are using two-sided paper, lay your paper with the patterned or colored side down before starting to fold. The color or pattern will be visible on the outside of your box and/or lid.
Step 1
Place a rectangular piece of paper on a hard, flat surface, with the short edges at the left and right, or in landscape orientation.
Step 2
Fold the top edge down to meet the bottom edge. Crease and unfold.
Step 3
Fold both the top and bottom edges in to meet at the horizontal crease line you have just folded. Crease well and unfold.
Step 4
Now fold the left, short edge over to meet the right edge. Crease and unfold.
Step 5
Fold both the left and right edges in to meet at the vertical crease line you have just folded. Crease well and leave folded. The creases made in Steps 3 and 5 will determine the depth of your box. The closer your folds are to the horizontal and vertical center of the model, the higher the sides of your box will be—and the other way around, of course. Your model should now have three horizontal crease lines, resembling an upright cupboard with its doors closed.
Step 6
Next you will fold in all four corners in a similar way. To do this for the two top corners, fold the paper downward and inward diagonally until the edges lie on the first horizontal crease you encounter. Likewise, for the two bottom corners. Fold them upward and inward until the paper reaches the first horizontal crease you encounter. Crease very well and leave all corners folded.
Note that your corners will not reach the center vertical crease line after they have been folded. To ensure that the sides and corners of the box do not sag, I always fold these corners so their inner points overlap the horizontal crease lines very slightly.
Step 7
Notice that there are two flaps that lie in the center of your model along the vertical crease line. Fold them outwards, to the left and right, as far as they will go. They will lie over the four corners you folded in the previous step. Crease these folds very well and leave folded.
Step 8
All that remains is to turn your flat piece into a three-dimensional box. Make the magic happen by grasping the two long folds you have just made at the vertical center of the model and lifting them upward and outward to form the sides of the box. The corners and remaining two sides will start to form as you do this. Pinch the folds from the outside to improve the shape of the box, and make sure all corners and sides are the same and look neatly creased. Your very own box/tray is ready for use.
For non-commercial use only.
Compiled by Lindy van der Merwe, November 2009; Revised, October 2022