Return to the SABER Exhibit Guide
The instructions and information on this webpage will help you complete the tasks and activities at the in-person SABER exhibit.
NFB EQ is part of NFB’s Spatial Ability and Blind Engineering Research Project (SABER), which was funded by the National Science Foundation. This material is based upon work supported by the National Science Foundation under Grant No. 1712887. Any opinions, findings, and conclusions or recommendations expressed in this material are those of the author(s) and do not necessarily reflect the views of the National Science Foundation.
About the National Federation of the Blind
The National Federation of the Blind (NFB) is the transformative membership and advocacy organization of blind people in the United States. Founded in 1940 and currently headquartered in Baltimore, the NFB consists of affiliates, chapters, and divisions in all fifty states, the District of Columbia, and Puerto Rico. Through our network of blind members, we coordinate many programs, services, and resources to defend the rights of blind Americans, provide information and support to blind children and adults, and build a community that creates a future full of opportunities.
We have produced science, technology, engineering, and math (STEM) programs for blind youth nearly every year since 2004. These programs, with support from universities, federal agencies, and STEM employers, have been facilitated with blind youth of various ages on university campuses, museums across the country, at the NFB Jernigan Institute in Baltimore, and have even been adapted for remote-learning experiences.
While the format has varied, the core values have remained the same: A fundamental understanding that blindness is not the characteristic that defines you or your future. Every day we raise the expectations of blind people, because low expectations create obstacles between blind people and our dreams. You can live the life you want; blindness is not what holds you back.
About the National Science Foundation
The National Science Foundation (NSF) funds research and education in science and engineering, through grants, contracts, and cooperative agreements.
The National Federation of the Blind was awarded a two-million-dollar grant (No. 1712887) from the NSF in 2017. The Spatial Ability and Blind Engineering Research (SABER) project was created as part of an overall strategy to enhance learning in informal environments.
The NSF program, Advancing Informal STEM Learning (AISL), provided the grant. The AISL program supports projects that advance new approaches and understanding, broaden access and engagement, advance research and assessment, and engage the public of all ages in informal STEM learning experiences. Blind youth are generally excluded from STEM learning and careers because materials for their education are often composed for sighted individuals.
The SABER project proposed that spatial acuity is an important element for blind persons to understand physical and mental structures. Thus, began the SABER project and efforts were made to educate blind youth in the discipline of engineering.
About the Spatial Ability and Blind Engineering Research Project
The National Federation of the Blind, in partnership with scholars from Utah State University, and educators from the Science Museum of Minnesota, developed the Spatial Ability and Blind Engineering Research (SABER) project to assess and improve the spatial ability of blind teens to broaden their participation in STEM fields and subsequently the NFB EQ program.
The goals of the SABER project included:
- Develop and investigate the reliability of a tactile instrument to test blind and low-vision youths’ spatial ability levels.
- Contribute to the knowledge base of effective practices regarding informal STEM education for the blind, particularly relating to the development of spatial reasoning abilities.
- Educate families, blind youth, and museum personnel about the techniques, tools, and instructional practices rooted in problem solving to effectively develop spatial ability skills in blind youth in informal STEM-learning settings.
- Incorporate promising techniques, tools, and instructional practices from the developed interventions into ongoing programming for both blind and sighted learners.
About the NFB Engineering Quotient (EQ) Program
The NFB Engineering Quotient (EQ) program was a one-week engineering program for thirty blind youth, ages 14-22. The program was held in the summers of 2018 and 2019 in Baltimore, Maryland at the NFB headquarters. The student participants engaged in an intensive weeklong residential program focusing on the various phases of an engineering design project with project partners and volunteer blind adult mentors.
Students were tasked with a project called A Place of My Own, which encompassed creating three-dimensional (3D) models using balsa wood. A Place of My Own brought to fruition, prototype representations of original structures created by each student. Participants not only constructed the prototypes, but also investigated the forces in their design, from roof to footing, using simple static analysis techniques. On the final day of the program, the students presented these prototypes in an expo-style event to invited guests, NFB staff, NFB members, fellow students, and instructors.
A Place of My Own challenged students to complete the entire engineering design process, from sketching their ideas to constructing them with wood. Students developed and built skills in drawing, engineering drafting, multi-view drawings, force propagation in a structure, and basic truss analysis.
NFB NFB Engineering Quotient (EQ) Models
The Pavilion Model
On display, you will find a pavilion model, which is an instructor-built, large-scale model of what the students were building. By investigating the model, one can get a good sense of the shape and structure that they are building and can become familiar with each of the components and their names. This model is enlarged to make it easier to feel each of the individual components. It is also used to illustrate the difference between roof surface area and tributary area, along with cardboard cutouts for each of those areas.
When used in the program, the model was placed on a table and a group of one to three students explored the various aspects of the construction with their hands. The model is intended to be sturdy enough to be easily transported, touched, and manipulated without falling apart. You will notice labels in large print and Braille are adhered to at least one of each: rafter, beam, column, and ridge board. The labels allowed students to learn the vocabulary of the structure as they became familiar with its shape.
Student Model
On display, you will find a replica of an actual student-designed “Place of My Own” project. NFB EQ participant, Gabriel Mendez-Frances, designed this structure. He stated, “I think working on the model was the highlight of the entire program as it really let us show how much we learned over the week in Baltimore. I worked on it until it was stable and structurally sound. The skills I learned that week and determination I had to get it done before finding a stopping point, are things I still value to this day.”
Angle/Length Cutting Jig
Providing students with every tool needed to complete their models completely non-visually and accurately was a major priority of the NFB EQ program. This required the development of some unique and useful tools, including the angle/length jig on display here.
Students needed to cut several identical rafter pieces at specific lengths and angles to build their model roofs. This jig creates a way to make consistent and accurate rafters, using only nonvisual skills.
The base of the jig is a twelve-inch square, with two adjacent sides marked at one-inch intervals. The jig is used by placing a piece of balsa wood, so that one end of the balsa wood hangs off the jig at the mark corresponding to the appropriate roof height, and the other end hangs off at a mark corresponding to the horizontal distance of a rafter, i.e., half their roof width. Then, the ends of the balsa wood are removed (the ends of the balsa wood that hang over the base of the jig) with a razor saw along the edge of the jig. Some balsa wood pieces, and a dulled razor saw are available to explore.
To help hold the balsa wood at the correct position on the jig, a fence is attached to the top of the base with screws that are threaded through slots in the base and the jig. The fence can slide around the top of the base to any position or angle, and then can be tightened down with wingnuts on the screws. Once the fence is fixed in position, the balsa wood can be held or clamped against the fence while the cuts are made.
Tactile Drawing and Tactile Graphics Exploration
A large component of both the NFB EQ and NFB EQ Online programs was the inclusion of tactile drawing and tactile graphics. Students in both programs got an opportunity to explore their artistic abilities and improve their technical drawing skills. They also learned how to interpret tactile graphics, including how engineers examine technical drawings.
Students used a variety of materials, from textured paper to simple pen and paper, to bring their imaginations to the page. While doing so, they built on their understanding of concepts like scale, background, 3D objects and viewing perspective. Students were also challenged to incorporate math into their drawings using properly measured angles and lines drawn to scale.
Tactile Drawing Workbooks
NFB EQ students were introduced to tactile drawing curriculum in both versions of the program. Students were initially taught basic concepts such as drawing straight lines to open and closed shapes. As they progressed through the curriculum, they learned concepts such as drawing in three dimensions and background verses foreground. Finally, students learned about the conventions of technical engineering drawings.
There are tactile drawing workbooks on display for you to explore. These were the workbooks that students used to supplement instructor lessons in the NFB EQ programs. You will notice the progression of tasks within the workbooks as students built upon their skills. You can also download your own copies of these workbooks from the NFB EQ for Teachers: A Nonvisual & Accessible Engineering Curriculum from the Introduction to Drawing and Intermediate Drawing and Drafting lesson plan section.
Tactile Drawing Boards
Given that tactile drawing was a critical component of the NFB EQ programs, how did students produce their tactile drawings? Well, students were all given access to tactile drawing boards called, Sensational BlackBoards, which allow the production of tactile drawings using basic tools such as copy paper and a ballpoint pen. This allowed for rapid, real-time, and inexpensive production of tactile drawings for each student.
On display, you will find a Sensational BlackBoard (SBB), copy paper, and a pen. Simply place a sheet of copy paper on top of the rubber surface of the board and use a pen to draw! That is it! You will find that using different pressures and angles yields different results. Feel free to experiment and even try out some of the activities from the tactile drawing workbooks that are also on display here. You can also find helpful information on drawing with the Sensational BlackBoard by viewing the video “Sensational BlackBoard Basics”.
Sensational BlackBoard Basics Video
Tactile Mental Cutting Test
The Tactile Mental Cutting Test, also known by its acronym "the T-MCT", is a spatial ability test designed around an individual's ability to mentally model the shape of a cutting plane that cuts through a three-dimensional object. The test operates on rotation and proportion constructs of spatial ability and allows us to now assess a tactile method of developing that model. The test was adapted from a paper test called the "Special Aptitude Test in Spatial Relations" that was developed by the College Examination Board in 1938. The portion of the test that it was developed from was entitled the Mental Cutting Test.
Spatial ability has been correlated to success in STEM students in college and STEM professions, but there are not many instruments that can assess spatial ability in blind individuals or how those spatial abilities are developed. This tactile and accessible test allows us to measure spatial ability in a new way; giving us the potential to improve STEM curriculum for all.
Tactile Mental Cutting Test (T-MCT) Book
The Mental Cutting Test (MCT) is commonly used to test people’s spatial ability in the fields of science, technology, engineering and mathematics. Spatial ability is a measure of an individual’s capability to exercise constructs of spatial thinking (like an object rotating or passing through a plane) then visualizing what the cut surface would look like.
Utah State University engineering professor Wade Goodridge, in partnership with the National Federation of the Blind developed the tactile version of the MCT. The administration protocol, response scoring sheet and test examples that Wade and his research assistants used during the NFB EQ program can be found in the T-MCT Administration Protocol booklet.
Now, are you ready to test your spatial ability? Then, pull up a seat to the Tactile Mental Cutting Test (T-MCT) display examples and grab a copy of the T-MCT Problems booklet. Each problem consists of a plastic block with a flat paper plane through the middle of it, showing a cut through the object. The answer to the problem is the shape of the surface, which would be made by cutting along the plane. There are two examples for you to review and twelve test models.
Start with example model one and feel the solid plastic block and the paper cutting through it. You may pick up the block and manipulate it in order to feel the shape of it. Example models one and two are made so that you can take them apart (where the cut would be), so that you can directly feel the cut side. Pull an example apart, and feel the shape of the cut surface. This surface is indicated by a softer felt texture.
Open the T-MCT booklet to problem example one (This booklet can be found at the in-person display). There are five answer choices (A, B, C, D or E) that may represent the shape of the cut side. Which do you think is the correct answer? Spoiler alert! Based on the surface that was revealed when you took example one apart, the correct answer choice is D (the shape with a bump dot in the center).
When you feel comfortable with example one, try example two on the next page. Once you have mastered the examples, try the twelve test models on display (the display rotates on top of a Lazy Susan for ease of use) on each subsequent page. Note each display model is numbered with its corresponding problem (found in the T-MCT Problems booklet).
Like before, you can take example two apart to feel the shape of the cut side. However, this is only a feature of the example models. The twelve models on the display will not come apart. Are you able to identify the correct cut side of each model? How many did you get right?
An answer key for each problem is below this section.
Tactile Mental Cutting Test Book Answer Key
Example Problem 1: D
Example Problem 2: C
Problem 18: C
Problem 20: E
Problem 22: A
Problem 35: C
Problem 57: E
Problem 60: C
Problem 61: D
Problem 63: D
Problem 65: A
Problem 67: A
Problem 70: E
Problem 71: A
T-MCT Administration Protocol
Actions for test administrator are marked as Admin Action, verbal instructions to be read to students are marked as Admin Read to Student.
Admin Action: Have student sit in seat at desk or table. Place answer binder (with student’s chosen media) in front of student, open to Example 1. Place Example 1 to the right of binder.
Admin Read to Student: In this test each problem consists of a plastic block with a flat paper plane through the middle of it, showing a cut through the object. The answer to the problem is the shape of the surface which would be made by cutting along the plane. There are two examples for you to go over, and then you will be asked to work through a set of 12 problems.
To the right of the binder in front of you, there is an example problem. Feel the solid plastic block and the paper cutting through it. You may pick up the block and manipulate it in order to feel the shape of it. This example is specially made so that you can take it apart where the cut would be, so that you can directly feel the cut side. Go ahead and pull this example apart, and feel the shape of the cut surface. This surface is indicated by a softer felt texture
Admin Action: Pause for interpretation of the cut side. If needed, help student identity felt surface.
Admin Read to Student: In the binder in front of you, there are 5 answer choices that may represent the shape of the cut side.
Admin Action: Pause for interpretation of answer choices
Admin Read to Student: Based on the surface that was revealed when you took the example apart, the correct answer choice is the shape in the bottom left with a post-it flag in the center.
Admin Action: Pause for interpretation of answer choices and flag.
Admin Read to Student: Do you have any questions about this example?
Admin Action: Answer any student questions.
Admin Read to Student: When you feel comfortable with this example, flip to the next page in the binder.
Admin Action: When student flips the page, replace example 1 with example 2.
Admin Read to Student: This page also has five answer choices that correspond to Example Problem two, which I have placed to the right of the binder. Like before, you can take the example apart to feel the shape of the cut side. This is only a feature of the examples, and test problems will not come apart.
Admin Action: Long pause for interpretation of Example 2 and corresponding answer choices.
Admin Read to Student: Go ahead and mark the answer choice you think is right by pulling a post-it flag from the flag dispenser, and placing it in the middle of the answer choice. Be sure that it fully sticks to the paper. If during the test you change your mind about a problem, the flag may be pulled up from the paper and moved to a new answer choice.
Admin Action: If student struggles to use the flags, provide any needed explanation.
Admin Read to Student: The binder in front of you contains the answer choices for all test questions. To your right is a lazy susan that contains all of the problems. You can rotate this in order to access each of the problems. The stand supporting each problem is label with the problem number, which will correspond to the number at the top of the answer sheet. When you have completed the problems, raise your hand to let me know and I will collect your answers.
Admin Action: Pause for interpretation of lazy susan and binder.
Admin Read to Student: Once you begin the test, I can no longer answer any questions. Do you have any questions now, before you get started?
Admin Action: Answer any questions…
Admin Read to Student: You may now begin.
Admin Action: Write the time on a sticky note, and place it in the binder (on the backside of example 2) When student is finished, record the time on a sticky note, and place it in the binder.
Admin Read to Student: Thank you very much for the participating in this research.
Admin Action: Dismiss student, record their answers, and prepare binder for new student.
Snap Cubes
Another tactile tool instructors used to teach spatial thinking was snap cubes. Snap cubes are simple, small plastic cubes which can be connected or “snapped” together to build in different directions. These cubes were used to help students understand the concept of three dimensions as well as engineering conventions for showing three dimensions in two-dimensional drawings.
On the display, you will find snap cube tactile graphics. These graphics each represent a snap cube model, shown from three different perspectives. The top left graphic represents the model from above, the bottom left graphic represents the model from the front, and the bottom right graphic represents the model from its right side. First, try to visualize the snap cube model in your mind using the three perspectives… then try to build it yourself using the provided snap cubes. Good luck!
NFB EQ (Engineering Quotient) Online
During the COVID-19 pandemic, the National Federation of the Blind, like so many organizations, needed to get creative about providing programming to blind youth. NFB EQ Online was designed to provide the spatial learning opportunities of NFB EQ, in a virtual setting in 2020 and 2021. The program involved asynchronous web pages, twice weekly Zoom® sessions, and an optional weekly additional virtual-support session for students who were interested in extending their learning even further. The program provided students with a box of all the materials they needed to participate.
NFB EQ Online provided students with an opportunity to build 3D Menger sponge models, get their hands on tactile puzzles, and of course, exercise their brains by folding complex origami projects. The activities were designed to utilize spatial thinking skills and challenge students to learn in new and fun ways; right in their own homes.
Check out some of the following activities on display that students participated in during the program!
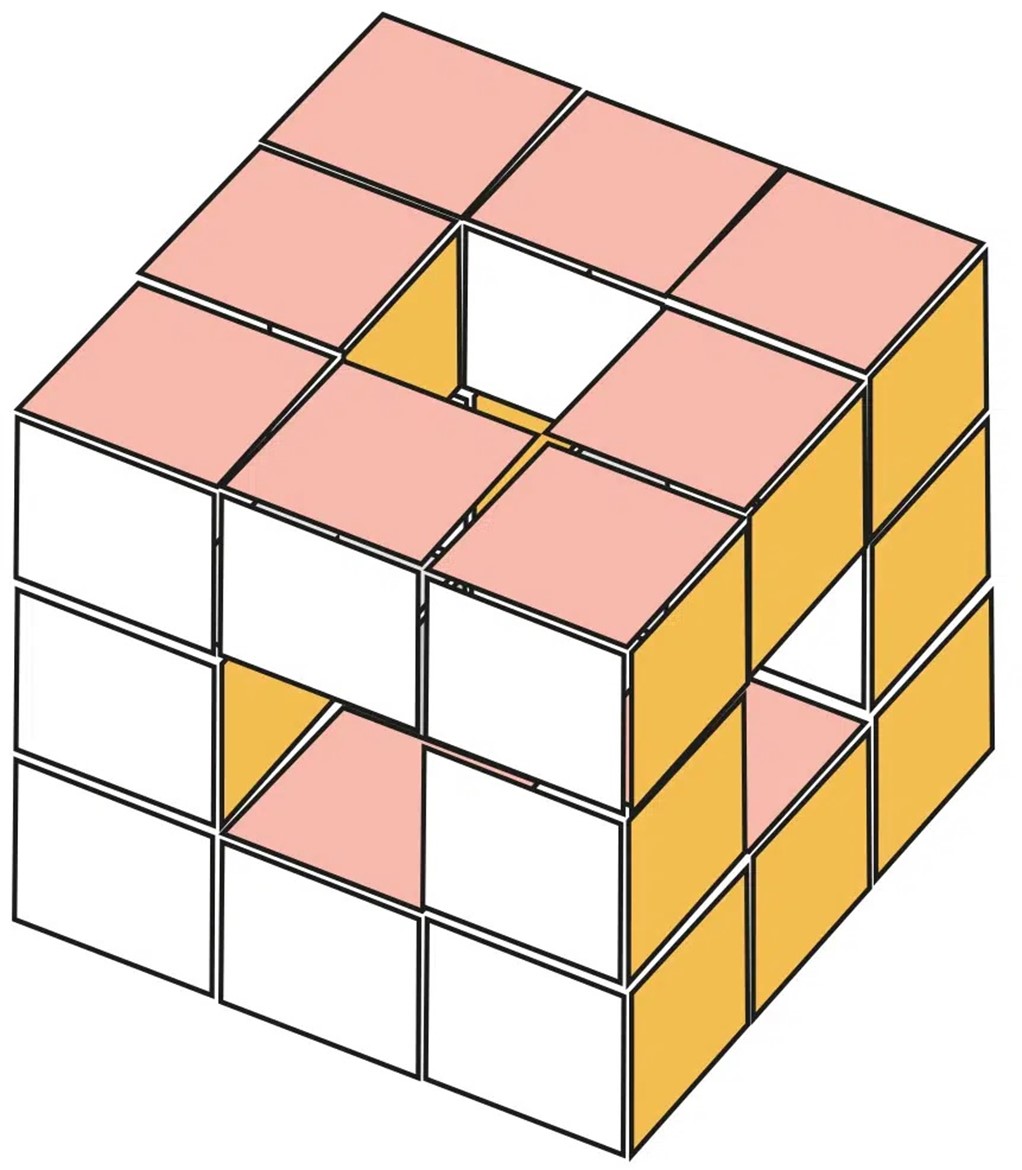
Menger Sponge
On display, you will find a basic cube and a level one Menger Sponge. Although the provided models use LEGO® bricks, this activity challenged students to build Menger Sponges using only index cards. This meant students had to determine how to keep the cube together without glue, tape, or any other adhesive. To provide support to the students in completing this activity, they were provided with a tactile example of how to fold the first two index cards, a descriptive instructional video of how to build their first cube, and interactive support during one of the virtual sessions.
Once students successfully completed one cube, they were encouraged to build as many as they could to try creating a level one Menger Sponge and beyond. For some context, a level one Menger Sponge includes twenty basic cubes, a level two Menger Sponge includes twenty level ones or four hundred basic cubes, and so on.
How to Build a Menger Sponge
Materials
- To make one basic unit cube of the Menger sponge you will need six, 3x5 inch index cards.
- To make a level-one Menger sponge, you will need one-hundred and twenty, 3x5 inch index cards.
STEP 1
First, lay two index cards across one another. They should be centered and at right angles. Fold the top and bottom flaps inward, and then fold the flaps on the sides in the opposite direction. Repeat this step three times. 
STEP 2
Separate the cards. You will have six index cards. Each card should have two flaps.
STEP 3
Assemble the cards so that all the flaps are on the outside, matching short edges to long edges. You can accomplish this by placing one card down on the table and putting one vertical card under each side.
STEP 4
You can then add a third card horizontally on one side, and a fourth card can then go opposite the third card horizontally. Keep adding sides until you form a complete cube. Make sure that all of the tabs are still on the outside of the cube. You now have a basic unit cube of the Menger sponge. Continue with the remaining steps to create a level-one Menger sponge.
STEP 5
Join two basic unit cubes together using the tabs. Remember the tabs on each cube run either horizontally or vertically on each face. To put two together, you will need horizontal tabs on one and vertical tabs on the other to lock together the corners of the tabs. Slip a flap from one cube under the corners of two flaps on an adjacent cube. Next, slip the flaps from the other side, under the other two corners of the flaps on the second cube. Continue repeating this step to join more cubes together.
STEP 6
To build a level-one Menger sponge, you need to connect twenty basic unit cubes. The completed larger cube will have three columns and three rows on each side. The center space on each side will be empty.
Tangram Puzzle
On display, you will find magnetic geometric puzzle shapes as well as a magnetic board to place them. These are very similar to the tangram sets each student received in their NFB EQ Online supply box.
So, what is a tangram puzzle? Initially, it is a seven-piece geometric puzzle arranged into a square. The challenge is to rearrange them into specific images using only the seven pieces. You will also find a few examples of the tactile graphics representing the images (e.g., turtle, house, bird) you can create with the puzzle pieces.
Now, it is your turn! Can you arrange the puzzle pieces to create the shapes depicted from the provided tangram puzzle book? How many puzzles can you complete? If you are stuck, review the solution in the answer book.
Tangram Puzzle Book
This book contains eighty different tangram puzzles, and in this case, there are nine different magnetic geometric shapes available to use (2 squares - small and medium, 1 rectangle, 1 semi-circle, 2 parallelograms – small and medium, 1 triangle and 2 circles – small and medium).
Do you want to try it? Here’s how… Pick a puzzle, remove the graphic from the binder, place the graphic on top of the magnetic board (outline facing up) and see if you can complete the tangram puzzle using the shapes. How many puzzles can you complete?
Please keep in mind, the puzzles range from easy to expert. Some puzzles take very few pieces, and some take a lot more. If you are stuck, please refer to the Tangram Puzzle Solutions Book.
Tangram Puzzle Solutions Book
This book contains the solutions to the eighty different tangram puzzles from the Tangram Puzzle Book. Each puzzle solution is numbered one through eighty and corresponds to its matching puzzle. Use the graphic to identify what/how many shapes you need to use, and where to place them to complete the tangram puzzle.
Additional Resources
NFB EQ for Teachers: A Nonvisual & Accessible Engineering Curriculum
NFB EQ for Teachers is a free, online curriculum and collection of resources for educators who want to teach NFB EQ, the National Federation of the Blind’s week-long engineering program designed for blind and low-vision youth.
The National Federation of the Blind has always been an innovator when it comes to education, technology, and access. We believe that STEM learning should be accessible for all, including blind and low-vision youth. As our world is evolving to become more and more digital, we discovered a need to create a version of our popular NFB EQ curriculum that is digitally accessible, free, and publicly available. In other words, an online, Open Educational Resource (OER) that allows educators to access the NFB EQ curriculum remotely — from anywhere.
NFB EQ for Parents: A STEM Learning Toolkit for Parents of Blind Children
The fields of science, technology, engineering, and math (STEM) are often seen as incredibly difficult or impossible for blind people to participate in, let alone make a career out of. NFB EQ for Parents was designed to support parents of blind children in guiding their children's successes in STEM and much more.
If you have questions about the SABER Exhibit, please contact us at 410-659-9314, extension 2418 or at [email protected].
References
- “How to Build Level-One Menger Sponge?” Abakcus.
- Lamb, Evelyn. “Build Your Own Fractal with MegaMenger!” Scientific American®. October 9, 2014.