Authors: Ann Cunningham, Peter Anderson
Class Size
- Written for 10-15 students but can be scaled up to 30 without significant adjustments.
Lesson Structure
65 minutes
- Introduction: 5 minutes
- Introduction to Drawing workbook: 55 minutes
- There are 2 example pages, 7 pages in the workbook and 5 times that students will draw on a separate piece of blank paper taken from the stack at their table. The lesson procedure is organized under headings for each page that students will draw on.
- Wrap up: 5 minutes
Objectives
Students will be able to:
- Perform basic drawing tasks such as holding a pen using a pencil grip; draw straight, wavy, and zig-zag lines; draw open and closed shapes.
- Match 3D objects with their 2D representations.
- Explain what a point of perception is. (Where are you in relationship to the object in the image?)
- Describe orthographic projection and isometric perspective and explain how each is used in technical drawing.
- Define and identify systematic drawing conventions such as front elevation, left and right side views, top view, edge, dashed/hidden lines, ground line, and portrait and landscape orientation.
- Explain how scale works and why it is important.
- Use the Sensational Blackboards to cut out closed shapes.
Prerequisite Knowledge and Skills
- No prerequisite knowledge or skills
Accessibility
- Sensational BlackBoard (SBB)
- Handout: Intro to Drawing Workbook (PDF for hardcopy production only) in large print and Braille with tactile and high contrast graphics
Materials
Materials needed per student (unless otherwise stated):
- Sensational BlackBoard (SBB)
- 8 sheets of copy paper
- 5 sheets of tracing paper, 8.5” x 11”
- Ballpoint pen, medium point Bic
- Kemper ball stylus .114” diameter
- Roll of masking tape (to anchor paper to the drawing surface)
- Workbook for Introduction to Drawing
- Paper cup with handle glued onto a chipboard base (see “Preparation”)
- 1” Styrofoam sphere, cube, and three-sided pyramid glued onto a chipboard base (see “Preparation”)
- 7” cone with truncated point with a 3” base diameter (see “Preparation”)
Note: Refer to Accessible Lab Equipment & Instructional Materials for additional information regarding specialized tools/materials.
Preparation
- Prepare example SBB pages (prepare one of each example for each student).
- Example 1. Place a piece of copy paper on the SBB in landscape orientation, and draw a long straight vertical line about 1-2 inches from the left edge of the paper. Make sure you make a very firm line so that it is easily discernable to students who are new to interpreting SBB drawings.
- Example 2. On a new sheet of copy paper on the SBB in landscape orientation, draw a zig-zag line on the right side of the paper, going from top to bottom, with 1-2 inch long segments. On the left side of the paper, draw a wavy line from top to bottom on the paper.
- Prepare the cone.
- Cut about ½” off the tip of the cone at the point. If your cone is hollow make sure to add a 3” diameter base.
- Glue paper cup with handle onto chipboard.
- Glue 1” sphere, cube, and pyramid onto chipboard base.
- Organize each student’s starting workstation as follows:
- Set the SBB directly in front of each student, horizontal (landscape) position, rubber side up.
- Place pen just above the SBB.
- Center a sheet of copy paper on each SBB and draw a firm straight line from the top of the page to the bottom on right side of page, make sure it is VERY easy to feel.
- Place a stack of copy paper between each pair of students about mid-range on the table, beyond that place a stack of tracing paper.
- Place the sphere, cube, cone, cup, and Introduction to Drawing workbook on the table further away than the other materials.
Related Videos
- Sensational BlackBoard Basics (video)
- Sensational BlackBoard Tips & Tricks: Tracing paper (video)
- Sensational BlackBoard Pop-Out Shapes (video)
Procedure
Introduction: 5 Minutes
- Introduction.
- Tell. “Have you ever had an idea that seemed so clear in your mind but when you started to describe it in words, it was just too complex to explain? Today we are going to introduce you to tactile drawing methods. This will allow you to share your great ideas with your friends. We are going to introduce you to tools and techniques, so that not only can you share your ideas more effectively with others, but you will learn skills to tactically access complex information much more efficiently through diagrams, charts, graphs, and maps as well.”
- Orientation to materials.
- Tell. “This is an introduction to drawing class. We’d like to make sure that you know how the table is laid out. By now you’ve found your board and pen. Beyond your board you will find a workbook. This is yours to keep. Next I would like you to find the small objects lined up beyond the workbook. We will use these in this lesson. To the right and/or left of each station is a short stack of copy paper in one pile and a stack of tracing paper beyond the copy paper. Please feel free to take more paper whenever you have filled the page you have been working on. If you do not want to keep your work, please drop the sheets onto the floor in front of the table. Do not crumple up the paper, it makes it harder to recycle. Any papers you do want to keep, please add to your workbook.”
- Orientation to the paper.
- Do. Pass out copies of Example 1, created in the lesson preparation. Help students orient the page on their Sensation BlackBoard in landscape orientation with the line on the left.
- Tell. “Place the page I am passing out on top of your Sensational BlackBoard. Feel the line drawn on the page already. The far side of the paper is called the top. In most systems of illustration, things that are up will be indicated on the far side of the page. Let’s see why. Put down your pen and hold your board with one hand on each side. Hold it up in front of you as though it is a camera and you are taking a picture. What direction is up? What side is up on your board? Now with both hands on each side of your board lower it to the tabletop. Now what side was up when you held it up? That is the side we are going to identify as up or top.”
- Portrait orientation.
- Tell. “Let’s add in one other convention while we are here. This board fits a standard 8.5” x 11” piece of paper nicely. Turn your board 90º so that the long axis is positioned up and down or vertical. That is a portrait format because most heads are taller than they are wide.”
- Landscape orientation.
- Tell. “Now turn the board so that the long axis is left and right or horizontal. This is also referred to as landscape.”
- “What is the horizon?” Where the sky and the ground seem to meet.
- “Right, horizontal refers to something that is parallel to the horizon.”
- Tell. “Now turn the board so that the long axis is left and right or horizontal. This is also referred to as landscape.”
Introduction to Drawing Workbook: 55 minutes
Example Page 1
- Holding the pen properly.
- Tell. “Pick up your pen. We are going to start by learning how to hold a pen. The pens themselves are inexpensive ink pens. If you feel it break, stop using it immediately and ask for another.”
- Teach. Pencil grip: Instruct the student to pinch the pen where the point becomes the barrel of the pen. Students should pinch it with their pointer finger and their thumb and then pivot the back part of the pen toward the top side of their wrist. Rest the barrel on the top side of their middle finger.
- Draw toward yourself.
- Tell. “Let’s draw some lines that are parallel to the line that is already on the paper. I want you to start and end each line with a nice firm punch into the paper. If you can make this a habit, it makes it much easier to find where your line starts and stops later when you come back to look at it.”
- “Put the tip of the pen on the top of the page and pull it towards you, down to the bottom of the page with firm pressure and finish with another period.”
- “Examine the line with your nondominant hand.”
- Teach. Students may ask: Should I draw it in the middle of the page? Should I draw it over the line that is there? Do you want me to draw a line like this? Answer all questions by restating directions: “Start at the top of the page in an unused space and draw a straight line down to the bottom.”
- Tell. “Let’s draw some lines that are parallel to the line that is already on the paper. I want you to start and end each line with a nice firm punch into the paper. If you can make this a habit, it makes it much easier to find where your line starts and stops later when you come back to look at it.”
- Draw away from yourself.
- Tell. “Pick up your pen. Put the tip at the bottom of the page and push it away from you towards the top. What happens?” It sticks. “When you push the point of your pen it has a tendency to push into the soft rubber. Pulling towards you will make a better line.”
- Check students’ work.
- Do. Go to each student and feel the line they have drawn with your hand.
- If the line is not pronounced enough to feel easily, direct the student to try again with more pressure.
- If the student is afraid they will tear the paper, tell them not to worry, this exercise is to explore the limits. The soft rubber of the SBB is not damaged by pens.
- If a student’s line is good, instruct the student to draw more lines and experiment with more and less pressure to explore line quality.
- Tell students to listen for the sound the paper makes when they draw a good firm line.
- Tell students they are learning a skill. Once they are able to control the type of line they make, they can use these variations to better express the information they want to share.
- Do. Go to each student and feel the line they have drawn with your hand.
Example Page 2
- Introduction.
- Do. Pass out copies of Example 2, created in the lesson preparation. Help students orient the page on their Sensational BlackBoard in landscape orientation with the lines on the left.
- Tell. “Let’s move on to some other types of lines. Place the next example I am passing out on your board. You can put your first page with your workbook. If you create any other drawings that you want to keep, you can put them with the workbook too. If you have drawings that you don’t want to keep, please just drop them onto the floor in front of you. Don’t crumple them! We will recycle them. “
- Wavy and zigzag lines.
- Tell. “On this page you will find a wavy line drawn on the left-hand side and a zigzag on the right. How would you describe these lines? How do they differ? Try drawing some wavy and zigzag lines.”
- Students Do. Students should observe that the wavy line is a continuous undulating line and the zigzag is made up of short straight lines connected together at angles.
- Teach. If a student has a hard time distinguishing the lines, have them observe you as you draw zigzag and wavy lines. A student can observe by holding the pen above your hand as you draw. Next, switch your hand with theirs and let them take control. If you have to take control of the pen to correct them, be sure to explain the correction you are making.
- Open shapes.
- Tell. “Zigzag and curvy lines are open shapes. Why do you think they are called open shapes? The beginning of the line and end do not meet. The line starts and stops in different places.”
- Closed shapes.
- Tell. “What do you think closed shapes are? A closed shape is a line that starts and stops at the same place. Can you name some closed shapes?” Circle, square, triangle, rectangle. “Right. We can also create organic shapes, something like the outline of a leaf could be called organic. Other organic shapes could be the outline of a stone or your hand.”
Blank Page
- Draw closed shapes.
- Tell. “Take a piece of tracing paper from the stack and place it on your drawing board. Draw some closed shapes on a sheet of tracing paper. Tracing paper cracks easier so you don’t have to press as hard and you can create more fluid lines. Notice that you can move in any direction more easily. The way I like to draw a closed shape is to place my pointer finger on the paper and start my line beside it. I can then draw my shape and finish up at the same place next to my finger.”
- You can draw anything.
- Tell. “Once you are able to draw open and closed shapes, you have all the types of lines you need to draw any object in the world because there is nothing that is not made from an open line or a closed shape.”
Workbook Page 1
- 2-dimensional pictures.
- Tell. “Open to page 1 with the page number in the lower right-hand corner. Identify the shapes on this page. We're going to talk about how we take information from the world and translate that into an image that can be expressed on a 2-dimensional picture plane.”
- Point of perception and outlines.
- Tell. “Pick up the little sphere at your station and run your finger around the edge of the sphere. What shape are you making when you outline this shape?” Circle. “When you're outlining you just go around the outline of the shape, you don't reach around behind it. This is because a picture is from one point of view or one point of perception. If we are looking at something visually, our eyes are our point of perception, and they can only see the side of the object that they are facing. When we reach forward to the sphere and outline it, we feel the shape of a circle from our point of perception. If you are having trouble figuring out what the outline of a complex object is, try using your pen to find the outline. If I was drawing this sphere on a piece of paper, which of the shapes on page 1 would be the best representation?” Circle.
- Apply point of perception.
- Tell. “Now let’s outline the pyramid. If you point one of the faces of the pyramid at your face and trace the edge, what shape do you make?” Triangle. “So which shape on page 1 would best represent the pyramid? And what about the cube?” Square. “So that's step 1 of how we make a transition from a 3-dimensional object to a 2-dimensional expression or representation.”
Blank Page
- Draw a pen line.
- Tell. “Take a piece of copy paper or tracing paper from the stack and place it on your drawing board. We are going to talk about some qualities that we can give to our lines. First I would like you to use your pen to draw a 3” to 4” diameter circle in the middle of your page. I would like you to make a nice crisp line.”
- Draw a ball stylus line.
- Tell. ”Next find the tool called a ball stylus. It has a ball end that is larger than the point of a ballpoint pen. I would like you to draw a good firm square around your circle using the ball tool. Try to make it large enough so that it doesn’t touch the circle. If it is wobbly, don’t worry about it.”
- Comparison
- Tell. “Let’s look at the two different types of lines we have made. What do you think? Can you tell the lines apart? Notice how the pen line is thinner and the ball line is much broader. This entire class is devoted to skill building. You are being introduced to tools that can be used many different ways. If you use a tool and don’t like the results, try using it in a different way, push harder or softer, hold at a different angle, and see if that gives you better results. Or maybe you need a different kind of tool. If you know what you want and you know what kind of line the ballpoint pen gives you and the ball tool makes, you can make a good guess about what other tool might create the type of line you are trying to make.”
- Dashed lines.
- Tell. “I would like to introduce one more type of line—a dashed line—that you will find useful. A dashed line is a line that is made up of short lines separated by small spaces. Please use your pen and draw a dashed line outside of your square. Dashed lines are used to represent objects or edges that are not visible from your perspective (e.g., the backside of an object).”
Workbook Page 2
- Elevations.
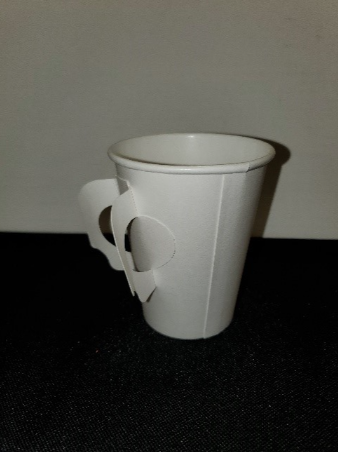
- Tell. “Next, we are going to look at the paper mug. And we are going to say that we're looking at this mug as an elevation. An elevation is a type of drawing that you will need for your project later on. It is one side of a building, usually the side with the front entrance. It illustrates the building from the ground up to the top of the building. Since your cup has no corners, just hold it up so that it is directly in front of our point of perception, tactually directly in front of your shoulder with your arm fully extended forward, or visually directly in front of your eyes with the handle on the right side of the cup or turned so that the handle is towards the back.”
- Trace the cup.
- Tell. “Now take your pen and trace the outline of the cup. You can start on one side at the bottom of the cup and trace to the top of the cup. Observe if that line is perfectly vertical or is it angled? Now trace the outline across the top of the cup. It is flat, you can lay your pen across the top to confirm that it is flat. Trace down the opposite side of the cup to the bottom. The bottom of the cup is also flat, it sits flat on the table. And there's a handle off to the right side. We are going to ignore the handle for the moment.”
- Cup shape.
- Tell. “I would like you to concentrate on the shape of the cup. Follow along on the illustration on page 2. So, if I outline this cup, I go straight across the top, straight down the left side, straight across the bottom, straight up the right side ignoring the handle. Do you recognize the shape of the cup and how it correlates to the picture on page 2? Now we figure out the handle. The handle does not quite go to the top of the mug, and it doesn't go quite to the bottom. It goes a little closer to the bottom than it does to the top, and it goes out maybe half as wide as the cup. Do you see in the picture how two lines were used to describe the handle? One creates the outline and the other creates the hole in the handle. Even if you understand how this represents the elevation or side view of this cup, it may leave you wondering how we know it is a round cup.”
Workbook Page 3
- Top and right view.
- Tell. “Let’s look at page 3. We're going to introduce one more way that engineers illustrate objects. And this includes objects like houses, skyscrapers, gears, water treatment plant designs, transmissions, airplane wings, pipelines, and many more. Look in the lower left-hand corner of the page. Does this picture look familiar? This is the cup again but now we have two other images on this page. One directly above the cup and the other directly to the right of the cup. These are two more views of the cup that can give us more information about the cup. The top left drawing is called a “top view.”
- Top view.
- Tell. “The top view is what you would observe if you stood up and looked straight down at your cup on the table or if you only touched the parts of the cup that face the ceiling. The top view is the same view used for floor plan and most maps. Trace your finger around the top of the cup, what shape is it? Can you find that line on the drawing? Next find the bottom of your cup with either your pen or your finger and trace that shape. Can you find that line in the drawing? How are the two paper handles drawn? We have the elevation or front view in the bottom left and a top view above the elevation.”
- Right-side view.
- Tell. “Next we will look at the right-side view, which is the bottom right image. This image depicts the cup as if we were looking at it directly onto the handle side or the right side of the cup. Can you explain to me what we are looking at and what each of the lines are representing?”
- Students Do. Students should be able to identify the top, bottom, and sides of the cup outline. They should be able to guess that the two vertical lines inside the outline represent (the edges of the cup handles).
- Other views.
- Tell. “When you analyzed the right-hand view you noticed the ends of the handles were represented as lines. Now I want you to consider how we could indicate where the handles are when we draw the cup from the left-side elevation. Could we see them from the left side? No. If we can’t see them what kind of line could we use to illustrate them?” Dashed line.
Blank Page
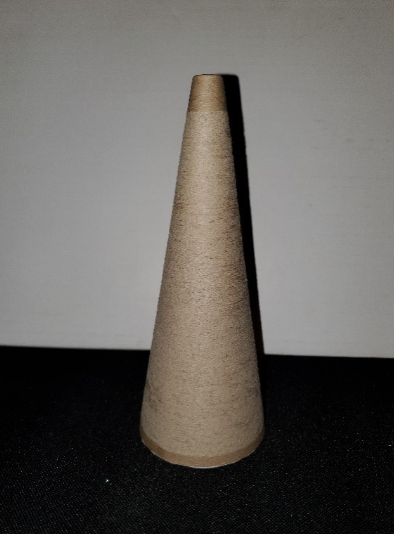
- Practice drawing views.
- Tell. “Take a piece of copy paper or tracing paper from the stack and place it on your drawing board. Now I would like you to draw a cone. We are going to illustrate the front view in the bottom left corner of the paper. Above that drawing we are going to illustrate the top view, and to the right of the front view, we will draw the right view.”
- Draw elevation view.
- Tell. “We're going to draw the elevation, or front view, to begin with. Find the cone at your station and hold it out in front of you with the narrow end at the top. Outline this shape. From this view we observe an angled side, straight horizontal bottom, another angled side, and a smaller straight horizontal top. Draw that shape.”
- Draw top and right views.
- Tell. “Now, if we reach out to the cone from a top view, we will feel the smaller circle at the top and the larger circle at its base. Draw that. Finally we will draw it from the right side. If we rotate the cone so that we are facing the right side, it still looks just like the front side because it is rotationally symmetric. Because of this, the right view will look just like the front view but will be drawn on the right side of your paper. Since this project is all about structures, let’s next look at a basic symbol for a house and talk about the structural details that make this icon work as an image that is easy to read as “house”.”
Workbook Page 4
- Horizon line.
- Tell. “Open to page 4. Let’s look at our picture. There is a line extending from the left-hand side of the paper the entire way to the right-hand side. This is called the ground line; it is also the horizon line. The horizon line is the place where the sky seems to touch the earth. Above that line is sky, beneath that line is ground. The background is near the horizon. The flower is in the foreground. Can you find the flowering plant? At the top is the flower, the stem is the line going down, and the short horizontal line is the ground line for the flower.”
- Ground line.
- Tell. “In this picture the ground line for the house is the horizon. The ground line refers to the point at which the object comes in contact with the ground. Can you point with your pen to the place the stem of the flower and the ground meet? Can you show me where the house meets the ground? There is a circle to the left of the house. Is that touching the ground? What do you think that circle represents?”.
- The basic house.
- Tell. “The house in this picture is the most basic house shape; it is often used as a symbol to represent a house or home. The body of the house is represented by a square. Can you find a rectangle in the square? That is the door to the house. The triangular shape on top of the square represents the roof of the house. This basic configuration is an iconic representation of a house in Western culture. It includes the minimum requirements of a home, a roof to protect from rain, four walls to secure the space, a door to enter and lock closed, and finally a window to connect with the outside.”
Blank Page
- Draw a house.
- Tell. “Take a piece of copy paper or tracing paper from the stack and place it on your drawing board. Now, I would like each person to draw their own home or their own idea of a home. This is just the first drawing of a home; this is a very rough draft. You can get as creative as you like. I am only asking for a quick sketch. I will give you a few minutes. Save that picture, please.”
Workbook Page 5
- Explore the picture.
- Tell. “Please take out page 5. This image should have familiar elements. Let’s name off the elements we can find in this picture.” Note: Students will find two houses of different sizes positioned on a ground line. In between there is a person.
- Scale.
- Tell. “How big would you estimate the house on the left to be? How tall do you think the house on the right is? To draw a person to scale with a house we would draw them a little shorter than the door. The large house is on the right side of this picture. Be sure that you have the page number in the lower right-hand corner of each page as you look at these images.”
Workbook Page 6
- Explore the picture.
- Tell. “This picture is much more realistic. It has information describing a much more complex home. Let’s explore. Can you find the door? What do you think is to the left of that? If that is a window. How many more windows does this house have? If you went into this house, where would those three upper windows be? To the left of the house is a shape that is familiar to us, what part of the house do you think is there? Did you notice the person off to the right? How does this home compare to the two in the other picture? Is it larger or smaller? How do you know?”
Workbook Page 7
- Apartment building.
- Tell. “There are three images on this picture illustrating three dramatically different types of homes. We're going to start with the left-hand building. It's an apartment building. If you go down to the bottom, you'll find double doors. How many stories tall is this building? How do you know?” Note: Get responses. “So the double doors are on one floor, the first row of windows that you find, there are four across, are on the second floor. Continue counting the rows of windows, or “floors,” up to the roof.”
- Person in scale.
- Tell. “Between the apartment building and the next is a little icon person in scale, this person is very small compared to the buildings. This icon person is also in scale to all three buildings in this picture.”
- Castle.
- Tell. “The next building to the right is a castle. Compare the sizes and complexity of design between the two. And this is about the same height as the apartment building but it is much more complex, and much more interesting architecturally. Feel the door located above the ground line in the middle of the structure. It is an arched opening where a drawbridge could be raised and lowered. When it was lowered the horses, wagons and foot traffic can enter and leave the castle. When it was raised, the opening to the castle was much easier to defend from invaders. There's a tower off to the right, and archers could protect their troops going in and out of the castle, when the doors are open, from these windows on this side of this tower and from the crenellated top of the tower. They can hide behind the teeth jutting up as they shoot from between those crenellations that you can feel there. Then we have a fancy pointed roof which is very decorative architecturally.”
- Teepee.
- Tell. “Finally the next structure to the right is a teepee. This teepee is also in scale with these two other buildings. The teepee is much taller than the person. It's twice as tall as the person; but you can see that since it's a cone shape the only part that's used is on the floor level. The height acts as a structural feature. The poles are leaned together to stabilize the structure.”
Blank Page
- Draw a second house.
- Tell. “Take a piece of copy paper or tracing paper from the stack and place it on your drawing board. Now, I would like you to take 5 more minutes to draw your second house. You can draw your dream house or a house that you're curious about or just have some idea about now that you have more information and possibilities about how houses are formed. Go ahead and draw your own.”
Wrap up: 5 minutes
- Q&A and reflection.
- Do. Ask if the students have any questions about the activities.
- Answer accordingly. Ask if they have anything they would like to share about this experience.
Differentiation
- Advanced.
- Do. If a student is picking up on the activities quickly you can always encourage them to start drawing a picture of any subject they like. Often students who do draw on their own will have a few go-to images in their bag of tricks. Once you see what they are doing, praise it for qualities you can identify and suggest a small challenging change. For instance, if they are able to draw a cartoon dog, ask if they can draw a puppy of the same breed. Or if it is a small image, call it a puppy and ask if they can draw a full grown dog or a cat. Be sure to catch their attention to complete each next step with the class and then let them know they are free to continue sketching. Ask them not to advance to the other tools and materials until they are introduced.
- Difficulties with hand strength.
- Do. If a student is not able to crack the copy paper you may want to switch them over to the tracing paper before you introduce the other students to it. Some students do not have enough hand strength to draw on copy paper. Drawing will help most students to develop strength and dexterity.
Goals, Objectives, and Outcomes Alignment
- 2A.2.5 (a) By the end of the program, using tactile drawing tools, participants will be able to: (1) hold a pen/pencil using an appropriate grip; (2) draw open and closed shapes free hand and using tools (stencils, straight edges); (3) create a simple map.
- 2A.2.5 (c) By the end of the program, participants will be able to use tactile technical drafting conventions accurately to create multi-view drawings of a provided basic 3-dimensional object.
Standards Alignment
NGSS Standards Alignment:
- SEP 8 - Obtaining, evaluating, and communicating information
- CCC 3 - Scale, proportion, and quantity
- HS-ETS1-3
CCSS Standards Alignment:
- CC.9-12.N.Q.2, CC.9-12.G.CO.5, CC.9-12.G.GMD.4, CC.9-12.G.MG.1
- CC.9-10.R.ST.3, CC.9-10.R.ST.5, CC.9-10.R.ST.7, CC.11-12.R.ST.3, CC.11-12.R.ST.5, CC.11-12.R.ST.7